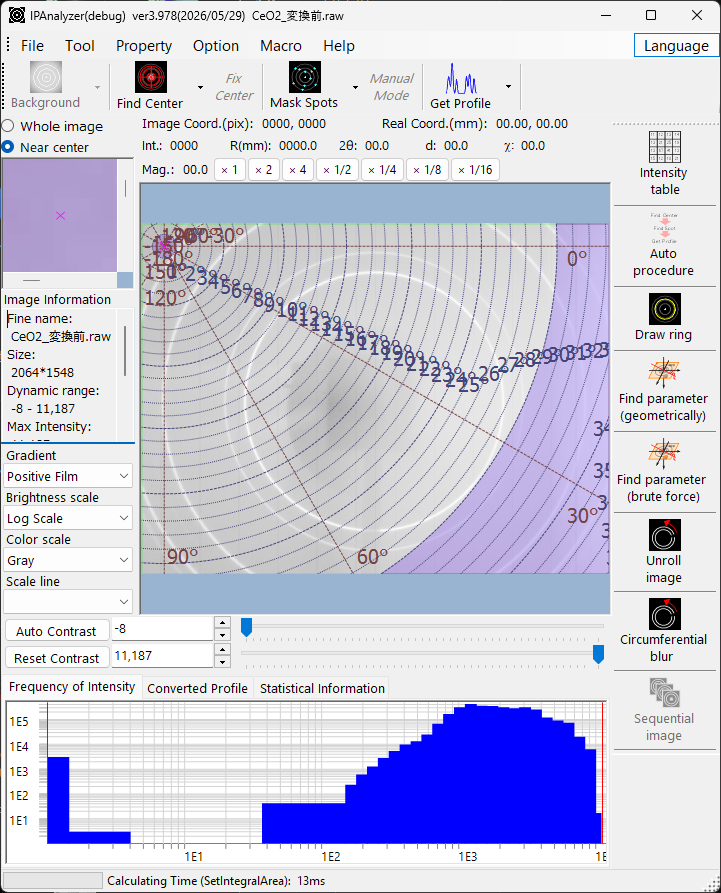
Main Window
The main window is the first screen shown when IPAnalyzer starts. It brings together the display of the loaded diffraction image, the main operations (find center, mask spots, one-dimensionalization), and the entry points to the detector-parameter settings.
The window consists, roughly, of the menus and toolbar at the top, the image display area in the center, the vertical toolbar on the right, and the graph area at the bottom.
Central View
Image display
The loaded image is displayed here. Depending on the mouse-pointer position, the area above the image shows the real coordinates (mm), image coordinates (pix), distance from center R (mm), scattering angle 2θ, d-value, azimuth χ, and intensity. The magenta × mark indicates the direct-spot (center) position.
Pixel states are shown in distinct colors.
| Color | Meaning |
|---|---|
| Cyan | Masked spot |
| Green | Region excluded from integration (set in Integral Region) |
| Magenta | Angular region excluded from integration (set in Integral Property) |
| Blue | Pixel below the intensity threshold (set in Integral Region) |
| Red | Pixel above the intensity threshold |
Mouse operations
In the normal mode:
- Press and hold the left button: searches for the spot center nearby.
- Left double-click: updates the center position to the clicked point.
- Right-drag: zooms into the dragged region.
- Right-click: zooms out.
In Manual spot mode, left-click masks and right-click unmasks. The mask shape and size are set on the toolbar and in the properties.
Auxiliary views and image information
Beside the central view are auxiliary displays. You can switch between Whole image and Near center: the whole-image view marks the current display range with a yellow frame, and the near-center view shows a magnified image.
Image Information shows the image resolution, maximum intensity, total intensity, header data, and so on.
Display adjustment controls
Controls that adjust how the image appears:
- Gradient: invert the tone.
- Brightness scale: logarithmic / linear.
- Color scale: grayscale / color.
- Scale line: scale-line display (none / coarse / medium / fine).
- Auto Contrast / Reset Contrast, and explicit minimum/maximum intensity.
- Magnification buttons (×1, ×2, ×4, ×1/2, ×1/4, ×1/8, ×1/16).
Lower View
The bottom area has three tabbed graphs/views.
- Frequency of Intensity: the intensity distribution of all pixels, on log–log axes. Zoomable with the mouse.
- Converted Profile: the diffraction profile after one-dimensionalization (Get Profile). Zoomable with the mouse.
- Statistical Information: statistics for a selected rectangular region (X1,Y1)–(X2,Y2). When a sequential image is loaded, statistics of the same region in other frames can also be compared.
Menus
The menu bar consists of File / Tool / Property / Option / Language / Macro / Help.
File
- Read image: opens a diffraction image. See Overview for the supported formats.
- Save image: saves as TIFF, PNG, CSV, or IPA format. TIFF preserves the original pixel intensities, PNG preserves the display (brightness, contrast, mask), and IPA is a distortion-corrected proprietary format (with metadata).
- Read / Save parameter: imports/exports the wavelength, camera length, pixel size, tilt correction, center position, etc. as a
.prmfile. - Read / Save / Clear mask: imports/exports a mask as a
.masfile, or clears it (the mask must match the resolution of the current image). - Close.
Image, parameter, and mask files can also be loaded by dragging and dropping onto the window.
Tool
- Reset Frequency Profile: clears the intensity-frequency graph (the image is kept).
- Calibrate Raxis Image.
Property
Wave Source / Imaging Plate Condition / Integral Region / Integral Property / Manual Mask Mode / After "Get Profile" / Unrolled Image Option / Miscellaneous. These open the corresponding tabs of the property window directly.
Option
- ToolTip: toggles the tooltips on buttons and menus.
- Flip: horizontally / vertically. Rotate: choose a rotation angle. Both affect the display only; the loaded image data itself is not changed.
- Ngen Compile and Clear registry are for development and troubleshooting.
Language
- Switches between English and Japanese (the setting is saved in the registry).
Macro
Help
- Program Updates, Hint, License, Version History, Web Page.
Operation toolbar
The main image-processing operations (with detailed options on the dropdowns):
- Background: subtraction of a background image (configured in Background Option).
- Find Center: detects the beam center by 2D Pseudo-Voigt fitting (search range 8 px by default, set in Miscellaneous). The dropdown also offers ring-based center detection.
- Fix center: fixes the center position.
- Mask Spots: detects and masks spots using the criterion mean ± standard deviation × Deviation. The dropdown includes mask-all, inverse-mask, manual, and so on.
- Manual: the manual mask mode. You can choose the shape (circle / rectangle) and size (8–256 px).
- Get Profile: integrates the image into a one-dimensional profile. Supports Concentric (2θ-based) and Radial (azimuth-based). The dropdown configures the Integral Property/Region selection, whether to find center and mask spots before integration, sending to PDIndexer, azimuthal-division analysis, sequential-image processing, and so on.
Toolbar (other tools)
The vertical toolbar on the right launches the various tools. See Tools for details.
- Intensity Table
- Auto Procedure
- Draw ring
- Find parameter / Find parameter (brute force)
- Unroll
- Circumferential Blur
- Sequential